| 1. |
Remove the passenger cowl top cover (A) to
remove passenger wiper blade.
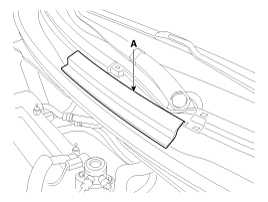
|
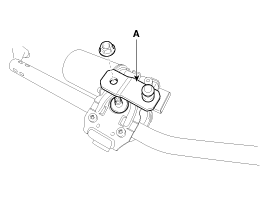
| 2. |
Loosen the windshield wiper arm nut (B) after
removing a wiper cap (A).
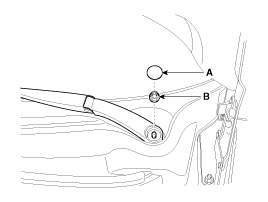
|
| 3. |
Remove the windshield wiper arm and
blade. |
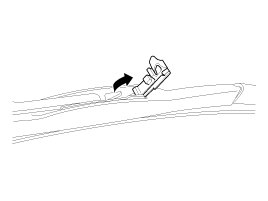
| 4. |
If necessary, release the wiper blade fixing
clip by pulling up and remove the wiper blade from the inside radius
of wiper arm.
|
| 5. |
Disconnect the washer hose (A) connected to
cowl top cover.
|
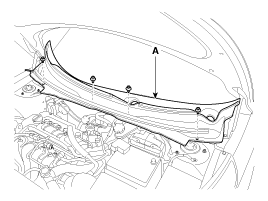
| 6. |
Remove the weather strip and the cowl top
cover (A) after removing 4 rivets.
|
| 7. |
Disconnect the wiper motor connector from the
wiper motor & linkage assembly. |
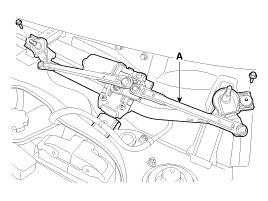
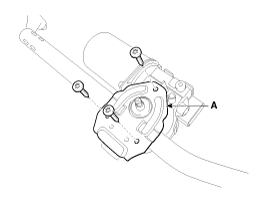
| 8. |
Remove the windshield wiper motor and linkage
assembly (A) after removing 2 bolts.
|
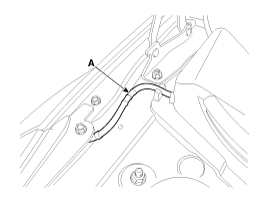
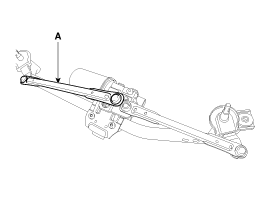
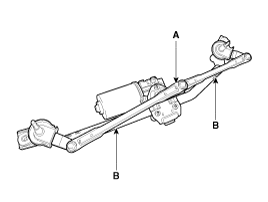
| 9. |
Hold the wiper motor crank arm and remove the
upper linkage (A) from the wiper motor crank arm.
|
Before removing the wiper motor and
linkage assembly, make sure that the linkage is stopped at
auto stop position.
To install the wiper motor crank arm
exactly, check that the linkage is aligned with the crank arm
in straight line and the angle of each linkages.
Be careful not to bend the linkage.
| |
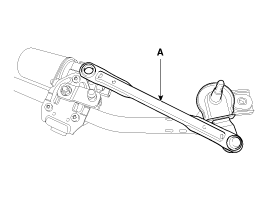
| 10. |
Remove the lower linkage (A) from the wiper
motor crank arm.
|
| 11. |
Remove the wiper motor crank arm (A), after
loosening the nut.
|
| 12. |
Remove the wiper motor(A), after loosening 3
bolts.
|
| 1. |
Install the wiper
motor. |
| 2. |
Install the crank
arm. |
| 3. |
Install the linkage to the wiper motor crank
arm.
|
To install the wiper motor crank arm
(A), make sure that the linkage (B) is aligned with the crank
arm in straight line and set the angle of each linkages
exactly.
Be careful not to bend the linkage.
|
|
| 4. |
Install the wiper motor and linkage assembly
and then connect the wiper motor connector.
Tightening
torque:
6.9 ~ 10.8Nm (0.7 ~ 1.1, kgf.m, 5.1 ~
8.0 lb-ft)
| |
| 5. |
Install the cowl top
cover. |
| 6. |
Install the windshield wiper arm and
blade.
Tightening
torque:
22.5 ~ 26.5 Nm (2.3 ~ 2.7 kgf.m, 16.6 ~
19.6 lb-ft)
|
| -
|
The windshield wiper motor must be
cycled to make sure that it is in the auto stop
position.
If necessary, adjust the wiper arm
and
blade. | | |
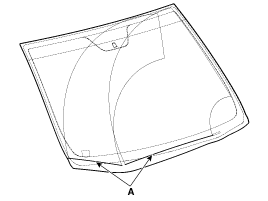
| 7. |
Install the wiper arm and blade to the auto
stop position.
A : Auto stop position (Blade)
|
| 8. |
Set the cowl top cover on the specified spray
position.
| -
|
When you turn on the washer,
confirm 50% or more of washer fluid lands within the
spray area. |
| -
|
If the spray area is not within
the standard positions, adjust the
nozzle(s). | |
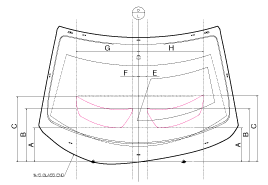
Specified position
|
Distance (in)
|
Distance (mm)
|
A
|
9.88
|
251
|
B
|
15.51
|
394
|
C
|
18.94
|
481
|
D
|
19.33
|
491
|
E
|
2.48
|
63
|
F
|
1.67
|
42.5
|
G
|
18.09
|
459.5
|
H
|
18.82
|
478
|
|
Speed Operation Check
| 1. |
Remove the connector (A) from the wiper
motor.
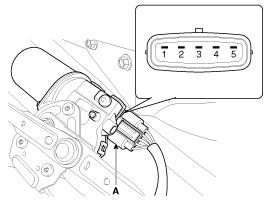
Pin No.
|
Description
|
1
|
Ground
|
2
|
Parking
|
3
|
Battery
|
4
|
Low
|
5
|
High
|
|
| 2. |
Attach the positive (+) lead from the battery
to terminal 3 and the negative (-) lead to terminal
1. |
| 3. |
Check that the motor operates at low or high
speed as below table.
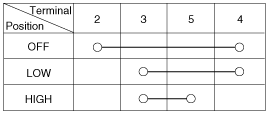
|
Common sources of contamination are
insects, tree sap, and hot wax treatments used by some
commercial car washes. If the blades are not wiping properly,
clean both the window and the blades with a good cleaner or
mild detergent, and rinse thoroughly with clean
water. | | |