Front Seat Assembly Replacement
| 1. |
Remove the front foot
cover. |
| 2. |
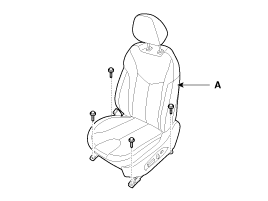
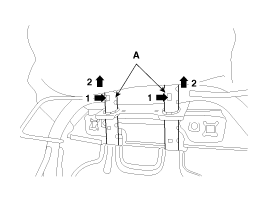
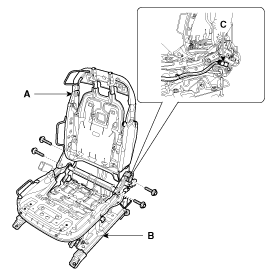
After loosening the front seat assembly
mounting bolts, remove the front seat assembly (A).
Tightening
torque :
34.3 ~ 53.9 N.m (3.5 ~ 5.5 kgf.m, 25.3 ~
39.8 lb-ft)
|
|
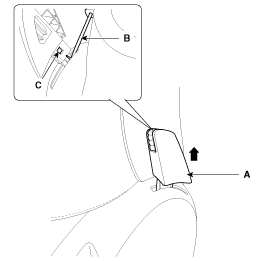
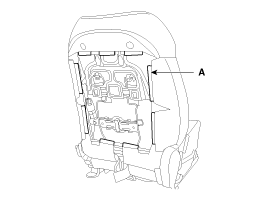
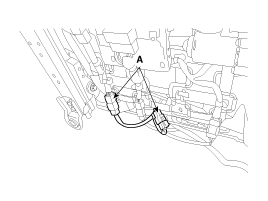
| 3. |
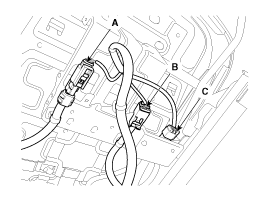
Disconnect the airbag connector (A), seat
warmer connector (B), seat buckle connector (C).
[Driver's]
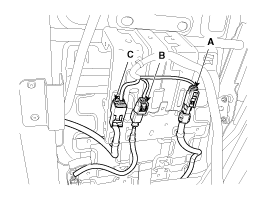
[Passenger's]
|
| 4. |
Installation is the reverse of
removal.
|
Seat Mounting Bolt Installation
Procedure
| •
|
Set the into the most rearward
position. Check then each slide is locked, and then
Tighten the front mounting bolt
temporarily. |
| •
|
Set the seat into most forward
position. Check that each slide is locked, and then
Tighten the rear mounting bolt
completely. |
| •
|
Set the seat into the most
rearward position. Check the front mounting bolt
completely. |
| •
|
Check that the seat operates back
and forth smoothy and the locking portion locks
properly. | | |
Front Seat Outer Shield Cover
Replacement
| •
|
When prying with a flat-tip screwdriver,
wrap it with protective tape, and apply protective tape around
the related parts your hands. |
| •
|
Put on gloves to protect your hands.
| |
| 1. |
Remove the height knob cap
(B). |
| 2. |
After loosening the mounting screws, then
remove the height knob (A). |
| 3. |
Remove the lock pin (D) after pulling out the
recliner lever (C). And then remove the recliner lever (C) by
pulling it.
| •
|
To see the lock pin (D), pull the
recliner lever (C) as arrow direction
. | |

|
| 4. |
Fold the front seat by pushing the seat
folding lever (A).
|
| 5. |
Unlock the lock pin (C) by pushing the pointed
tool (B) between the seat folding lever (A) and lock pin (C). And
then remove the folding lever (A) by pulling it as arrow
direction.
| •
|
Use the thin and flat shape
tool. | |
|
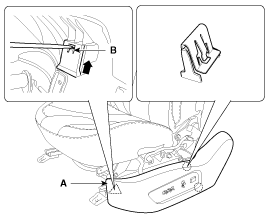
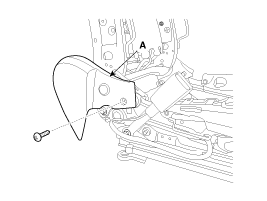
| 6. |
To remove the front shield outer cover (A),
disengage the lock pin (B) and remove the front shield outer cover
(A).

|
| 7. |
Installation is the reverse of
removal.
| •
|
Replace any damaged
clips. | | |
Front Seat Outer Shield Cover
Replacement
| •
|
When prying with a flat-tip screwdriver,
wrap it with protective tape, and apply protective tape around
the related parts your hands. |
| •
|
Put on gloves to protect your hands.
| |
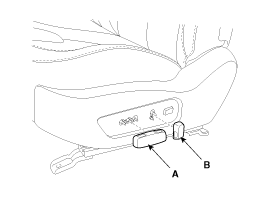
| 1. |
Remove the recliner switch (A) and height
switch (B).
|
| 2. |
To remove the front shield outer cover (A),
disengage the lock pin (B) and remove the front shield outer cover
(A).
|
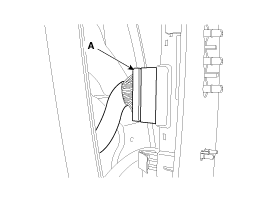
| 3. |
Disconnect the connector (A).
|
| 4. |
Installation is the reverse of
removal.
| •
|
Make sure the connector is plugged
in properly. |
| •
|
Replace any damage clips.
| | |
Seat Back Cover Replacement
| •
|
When prying with a flat-tip screwdriver,
wrap it with protective tape, and apply protective tape around
the related parts your hands. |
| •
|
Put on gloves to protect your hands.
| |
| 1. |
Remove front seat
assembly. |
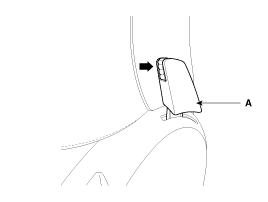
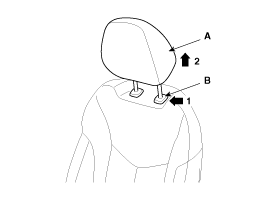
| 2. |
Push the lock pin (B), remove the headrest
(A).
|
| 3. |
Remove the protector (A).
|
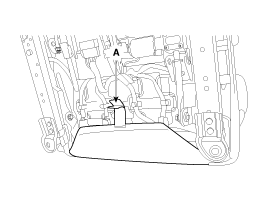
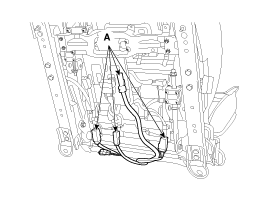
| 4. |
Disconnect the connector (A) and the mounting
clips.
|
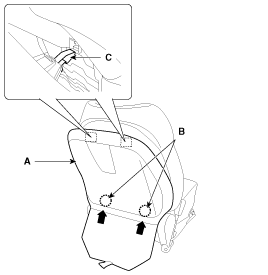
| 5. |
To disengage the lock pin (C), lift up the
front seat back board (A) to the arrow direction with holding the
bottom place (B).
| •
|
Be careful not to damage the lock
pin. | |
|
| 6. |
Push the protecter (A) by the seat back
frame.
|
| 7. |
Remove the protector (A).
|
| 8. |
Pull out the headrest guides (A) while
pinching the end of the guides, and remove them.
|
| 9. |
Remove the seat back cover (A) from the
frame.
|
| 10. |
After removing the velcro tape (B) on the
front of seat back and remove the seat back cover (A).
| •
|
When removing the hog-ring clip,
remove the hog-ring clip with pressing the wire not to
separate the wire from the sponge.
| |

|
| 11. |
Installation is the reverse of
removal.
| •
|
Make sure the connector is plugged
in properly. |
| •
|
Replace any damage clips.
| | |
Seat Cushion Cover Replacement
| •
|
When prying with a flat-tip screwdriver,
wrap it with protective tape, and apply protective tape around
the related parts your hands. |
| •
|
Put on gloves to protect your hands.
| |
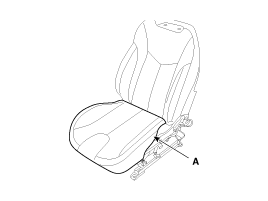
| 1. |
Remove the following items first.
| B. |
Front seat outer shield
cover | |
| 2. |
Disconnect the connector (A).
|
| 3. |
Push the protecter (A), and then seat cushion
cover (C) from the frame(B).
|
| 4. |
Remove the seat cushion cover (A) from the
frame.
|
| 5. |
After removing the velcro tape (B) on the
front of seat cushion and remove the seat cushion cover
(A).
| •
|
When removing the hog-ring clips,
remove the hog-ring clips with pressing the wire not to
separate the wire from the sponge.
| |
|
| 6. |
Installation is the reverse of
removal.
| •
|
Make sure the connector is plugged
in properly. |
| •
|
Replace any damage clips.
s | | |
Seat Frame Replacement
| •
|
When prying with a flat-tip screwdriver,
wrap it with protective tape, and apply protective tape around
the related parts your hands. |
| •
|
Put on gloves to protect your hands.
| |
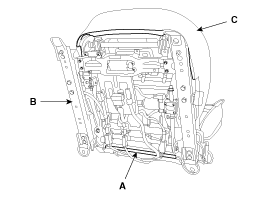
| 1. |
Remove the following items first.
| B. |
Front seat outer shield
cover |
| D. |
Front seat cushion
cover | |
| 2. |
After loosening the mounting screw, then
remove the front seat shield inner cover (A).
|
| 3. |
Disconnect the connector
(C). |
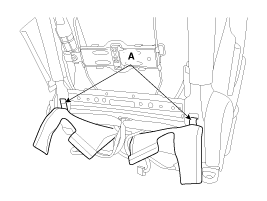
| 4. |
After loosening the mounting bolts, then
disconnect the seat back frame (A) and seat cushion frame
(B).
Tightening
torque :
49.0 ~ 63.7 N.m (5.0 ~ 6.5 kgf.m, 36.2 ~
47.0 lb-ft)
|
|
| 5. |
Installation is the reverse of
removal.
| •
|
Remove the side air bag for
replacing side air bag installation
seat. |
| •
|
Before service, be fully aware of
precautions and service procedure relevant to air
bag.
(Refer to page RT - Airbag)
| | |